Little Egrets have become very common now and, as always, common birds are very easy for the photographer to ignore. Not this one however. I first noticed it posing on a floating platform at the RSPB Ham Wall reserve. First like this.
Then like this.
But the main thing was that it had a novel way of fishing. It would fly low over the water, trailing its feet to make a splash. This would scare the small fish which then jumped out of the water ahead of it. It made repeated stabs downwards to catch them. You can sort of see the technique in these two shots.
The small splashes ahead of the Egret are the little fish breaking surface. Clever or what?
Other Ham Wall activity included frequent flights by a Grey Heron returning to its nest. They have a particular way of flying when doing this.
Of course, Ham Wall is now famous for its Great Egrets and they were much in evidence. Again they make something of a display each time they land in the reeds making for some unusual poses.
Incidentally, for you photographers, I was trying out my new Canon EF 400mm f4 DO II lens on these shots. I had the 2x converter attached and was just amazed at the high quality of the images. Before, using the original version of this same lens, the 2x converter was practically unusable because of the huge negative impact it had on image quality - not any more! Here is a Great Egret making a fly past with its friend.
I had a really great afternoon that day. I was keen to get some test images with my new lens and these Marsh Harriers obliged by flying closer than they ever have before. I was very pleased with the sharpness and detail in the photos. You can see them a little more closely on my website at www.johncrabb.co.uk where I have just posted a few of the latest photos.
On another occasion I spent some time on the South Coast. This Barn Owl made a few unpredictable appearances and I was very excited to see it! I did not yet have my new lens when these shots were taken, and I had traded in my old one so I was reduced to using my standby lens. The photos are not great and I am hoping to get one more go at it with the Canon EF 400mm f4 DO II to see what a difference it will make. I guess it is rather unlikely that the owl will cooperate in this venture! In fact I was on site first thing on Sunday morning and it did not appear so maybe the show is over.
Finally, as regular readers will know, I am a sucker for a good duck! So here is a Shelduck making a low pass for the camera.
And this one is a female Gadwall.
I am really excited about my new lens and look forward to many hours getting better and better photos.
Please visit and, if possible, "like" my page on Facebook
www.facebook.com/johncrabbwildlifeimages
Until next time.
All bird photography involves a lot of waiting around for something to happen. When it does of course, things get very exciting. Barn Owls are a case in point.
When you are waiting for a particular bird to show it seems that they never will. There is nothing quite so hopeless as a landscape devoid of the bird you have come to see. However hard you look, and however hard you hope, it is just not there. Worse than that, you cannot imagine that it ever will be. Time passes and brings no improvement. Time continues to pass.
Then, if you are lucky, the owl is suddenly in front of you. Unexpectedly, because by that time you have resigned yourself to disappointment. Suddenly there is a lot to do. If you are not lucky on that occasion then, of course, you just have to go home without seeing it.
When I give my talks on bird photography, people often say to me "You must be very patient." I never know what to say to this. It is true that I am content to station myself for hours, camera at the ready, to see what happens. But it is not like waiting for a train, for example, I am very bad at that sort of thing. When you wait for a train, all the time spent waiting is just wasted. There is nothing else to do and only the arrival of the train will put you out of your misery. Bird watching and photography is not like that. The being there is part of it.
I do not regard time spent waiting for birds to show as wasted time - time that I am impatient to see finished. I settle down and enjoy the teasing sense of possibility. Anything might happen and I am open to it. You can never predict what could happen next. Maybe nothing, it doesn't matter.
I feel relaxed and attentive and sometimes become absorbed by the scene before me. I try to open my eyes and my mind and let the world in. I like it when the barrier between "me" and "it" dissolves. When the world becomes me and I become the world. Sounds pretentious I suppose, but it honestly happens.
If I do want some distraction, there is always something going on and, when you are in that state of mind, you are prepared to look at things that would not normally have caught your attention.
You might notice something you have never registered before. Take for example the shape of the pupil in this Wood Pigeon's eye. It is distorted. They all have it.
Here it is in close-up.
It is as if the iris has folded down at the bottom. Maybe this allows the pigeon to get a wider field of view in one direction. If upwards, it may help it spot predators. If downwards, maybe it can see its food better. If anyone knows what this is for, please let us all know!
In passing, I cannot help thinking that it looks like a fairly casual and lazy form of evolutionary adaptation - just a perpetuated defect in a normal eye. Any comments?
Finally, here is another interesting photography item. Before taking the first picture of this distant house (it is across the valley from my garden) I stuck a broad piece of masking tape vertically across the front of my 400mm F4 lens - it looked ridiculous! The lens is about four inches in diameter, and the tape about half an inch wide. Surely it would ruin the photo.
For the following photo, I removed the tape.
There is no sign of the tape itself, but the contrast in the first picture is somewhat lower than when the tape has been removed in the second one.
I do not think that you would get away with this on a short-focal-length lens, but you can with a telephoto. The tape is so out of focus that it hardly betrays its presence. The image is happily formed by the rest of the glass. All this means, of course, that you need not get too upset if you scratch your telephoto lens - you will be heart broken of course, but you needn't really be! Small comfort I know.
So that's it for this time. Please have a look at my website at www.johncrabb.co.uk
and kindly visit me on Facebook at www.facebook.com/johncrabbwildlifeimages
... yes, but in this case it's a Duck on a Fence. Surely not what Leonard Cohen had in mind when he wrote his famous song.
I spotted it on a fence alongside a footpath in Devon: a drake Mallard. Thinking that it would surely fly away as I approached, I started taking photos early on and continued as I walked closer. In fact it did not move and my photos got bigger and bigger!
In the end it just muttered to itself as I walked slowly by. So much for my dramatic "launching into the air shot".
A few years ago I came across a Mallard on a thatched roof in France. I am perhaps thinking of doing a series entitled "Ducks in Strange Places". What do you think?
 (By the way, and just while I think of it, if you have scratched your camera lens, scroll down to the bottom to see the results of my little experiment.)
It was quite a good day out actually, it started just after dawn with this Barn Owl hunting over the fields - admittedly in rather dull light.
(By the way, and just while I think of it, if you have scratched your camera lens, scroll down to the bottom to see the results of my little experiment.)
It was quite a good day out actually, it started just after dawn with this Barn Owl hunting over the fields - admittedly in rather dull light.
And here it is with some prey, a Short Tailed Field Vole.
I also made the acquaintance of this confident little Reed Warbler singing its socks off in a reed bed.
Not to be outdone, this Reed Bunting was also singing at the top of its voice.
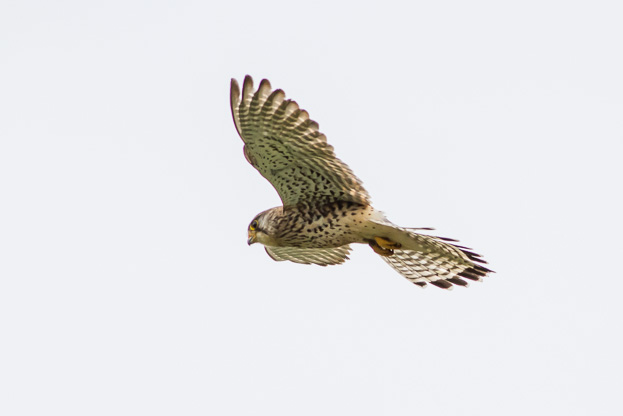
Later this Kestrel hovered briefly overhead.
No more photos for a few days as I will be without my favourite camera lens from now on, the Canon EF 400mm F4 DO IS. I am trading it in for the upgraded version 2. Quite sad to pack it into a box ready to send off, it has served me very well over the last few years so I can only hope that I will enjoy the new one as much.
Actually, on the subject of lenses, I conducted a little experiment. As I spruced up the old lens in an attempt to get the highest possible part-exchange offer for it, I noticed again that there were a few very fine micro-scratches in the blueish lens coating. This does not make any difference to the image quality at all. To prove it I took this photo:
Then, I removed the lens hood so that I could get close to the glass and held my index finger up right in front of the lens, partially blocking it, and took the picture below. I defy anyone to spot any difference. My finger was totally invisible in the final image. So much for worrying about micro-scratches!
So, that's it, just a brief blog for today. Please visit my website to see more at www.johncrabb.co.uk
and perhaps "like"
my Facebook page at www.facebook.com/johncrabbwildlifeimages
This is the "technical" blog I have been threatening for some time, it is an extension of the autofocus tips and advice I gave in a previous blog
http://johncrabbwildlifeimages.blogspot.co.uk/2015/05/birds-in-flight-with-canon-7d-mkii.html
In that blog I talked about the choice of 7D Mk2 autofocus settings for photographing birds in flight. Here I want to address the issue of fine-tuning, or micro-adjusting, the autofocus system to make sure it gives you sharp images.
I do not ever read very much about this, but in my view it is absolutely essential. If you have not done it, there is every chance that your lens is seriously under-performing.
When you activate the AF system by half-pressing the shutter button prior to the shot, the camera obviously tries to focus on the subject. It normally does a good job, but it is prone to two types of error which will affect how sharp an image it comes up with.
The first type of error is a random error. So if, say, you asked the camera to autofocus on the same object a hundred times in succession, on average it will home in on the correct distance, but there is a plus-or-minus factor affecting each attempt. So, there will be a variability in the sharpness between images depending on how successful the AF system was on a given shot. The AF system is therefore not perfect, but this is how things are in the real world with everything of this nature.There is nothing we can do about this except take a lot of shots and hope that a few are as sharp as we would like. This type of error is like a darts player aiming for the bull; over several hundred shots there will be a scatter of points at different distances from the aiming point, most will be in or close to the bull, whilst some will be a bit more wayward and others in between. It is called a "distribution" of results.
The second type of error is a systematic error. This means that the correct distance mentioned above may be no such thing. If a systematic error is present then the AF system will home in on an average focus distance which is always displaced from the actual subject, either a little too near to the camera or a little too far away. We can do something about this and we should otherwise the image will be blurred to one degree or another. Oddly, of course, the random variation always present could mean that some of your shots could occasionally be sharp, but we do not need to confuse ourselves with this.
Here is how to do it on your Canon 7D Mk2. It is a simple procedure, but sometimes difficult too. All will become clear. This is where it all starts.
Go to the AF menu, fifth item as shown, and scroll the highlight down to the bottom. Press the SET button. This is how my camera looks when I do that because I have already microadjusted my lens..
Scroll down to the third option, as shown above, and this time press the INFO button which is towards the top left on the rear of your camera. Then you will see this (my screen photo is a little out of focus itself, but I hope that you can read it OK.)
Now, you will find that you can move the pointer left and right using the large wheel on the back of the camera. This pointer is showing you the relative adjustment you are making to the average focus position. Negative values mean you are moving it further away from the camera, and positive ones mean you are bringing it closer. The aim is to make it coincide with the actual position of the target you are focusing on. This is done by trial and error as described below.
So you will need to set up a target to photograph. In my examples I have used a printed page from a TV guide. You need something with fine and coarse detail to help you decide whether or not it is in focus.
The target should be set up at a distance of between 25 and 50 times the focal lengh of the lens. In my case I was adjusting a 400mm lens with a 1.4x teleconverter attached, I had it about 25 metres away at the bottom of my garden.
Then all you have to do is adjust the AF microadjust pointer, press SET to activate it and take a picture. It is best to set the camera to ONE SHOT AF and manually adjust the lens focus wheel to blur the image a bit before activating the AF to make it work a bit harder.
I suggest that you work methodically through the AF microadjust settings from -20 to +20 in increments of 5 initially. You may need a note pad to record what you are doing and as an aid to interpreting the images afterwards.
You will end up with series of images which are in focus to different degrees. This one, for instance, is decidedly out of focus:
Whereas this one is better:
But is it better than this one? I think not.
And therein lies the rub!! It is quite easy to eliminate AF microadjust settings that give horrible results, but very difficult to choose between the three or four that give the better results. You can, of course, repeat the tests with microadjust settings varying by just 1 or 2 points over a more restricted range to see if that helps you decide. You can see that, in the end, I chose a setting of -9 for my lens combination.
One tip is to go through the initial test images eliminating the obvious bad ones then if, for example, you are left with reasonable results ranging from settings of -5 to +15, then it is odds on that the best result will be obtained somewhere in the middle of that range, i.e. at about +5. You can investigate. Always remember, that your efforts will be somewhat confounded due to the random variation which also affects the results. You may need to do it a few times or, as I did, get the best possible setting like this then experiment further when shooting in the field.
I reiterate here that, in my view, this is an essential adjustment to make. I have found huge differences in the required microadjust settings for each of my lenses and again if teleconverters are used. Without making these corrections you could conclude that you had a bad lens. This is why I am somewhat mistrustful of lens reviews where they compare sharpness - how did they focus them?
There are other ways of doing this and you can buy special target apparatus, but the above worked for me. Good Luck!
Please visit my web page www.johncrabb.co.uk and my Facebook page www.facebook.com/johncrabbwildlifeimages
You may also like to read my Blog article on the effect of Lens Extenders, or Teleconverters, on the quality of wildlife images.
http://johncrabbwildlifeimages.blogspot.co.uk/2015/07/do-lens-extenders-ruin-image-quality.html
It has some perhaps surprising conclusions!
Definitely not tired of photographing Bitterns yet! Now well established in the Somerset wetlands they still make a fine and exciting sight as they pass over the reed beds. This one was photographed yesterday at #RSPB Ham Wall.
I am still hoping one day to catch one landing in the reeds, wings open and feet extended. You gotta have a dream! But for the time being the occasional fly-past is still pretty rivetting. Enough to grab everyone's attention. Other birds going about their business on a fine June day included this Carrion Crow. It was hunting over the reed tops.
From this position it can look down the reed stems, the reed beds become transparent when viewed from directly above, to see if any eggs or young chicks have been left unguarded. Then it is only a matter of dropping down between the yielding reeds to claim the prize.
It is quite difficult to photograph a black bird against a white sky as I was obliged to attempt to do yesterday. The photos are not great, but the story is a good one. On this occasion I did not see it catch anything, but a previous blog showed one flying off with a stolen egg, which it later dropped - http://johncrabbwildlifeimages.blogspot.co.uk/2015/05/hobbies-and-other-challenging-birds-in.html
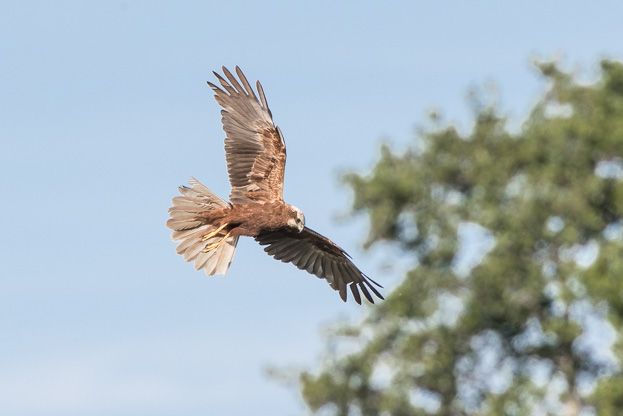
Another hunter which uses exactly the same technique is the Marsh Harrier, shown below cruising the reed tops.
A very large percentage of young chicks are taken by predators. It amazes me that the target species survive, but they do!
There were still one or two Hobbies patrolling the skies at #HamWall and feasting on the many dragon flies - there were thousands, if not millions of them (Dragonflies that is, not Hobbies.)
I watched the Dragonflies swarming among the reed tops and it soon became apparent that they were feeding on small black flies that had hatched in their countless swarms. I concentrated on one black fly for a few seconds and saw a Dragonly swoop in to eat it. Too quick for a photo though.
These Hobbies were concentrating on the Dragonflies cruising at a slightly higher altitude.
The following shot shows a Hobby eating a Dragonfly in flight.
Other interesting birds to fly by were this Great Crested Grebe.
And a Tufted Duck.
So, that was five hours enjoyably spent. No great photos to show for it, but a lovely day and just enough activity to keep me awake. Love it.
I will be publishing further blogs on the Canon 7D Mk2 autofocus system soon, but my own personal obsession at the moment is the up-coming possible purchase of a new lens. Will update you if and when I take the big leap.
Meanwhile, please visit my website www.johncrabb.co.uk and follow me on Facebook at
www.facebook.com/JohnCrabbWildlifeImages