ALL PHOTOS IN THIS BLOG WILL ENLARGE IF YOU CLICK ON THEM
Here is the finished painting. I thought I had better come clean up front so that you can decide if you want to read on. If so, here is the story of how it was painted.
I started the same way as usual, transferring a sketch outline across from one of my photos.
I use the squares method as you can see.
The next step was to block in some of the darker colours in acrylics. I have developed the habit of using acrylics to create a fairly developed under painting before proceeding to oils. I find I can relax and work out any technical problems as I go along. Any errors can be easily over-painted as the paint dries so quickly - too quickly for a finished work in my assessment, but fine at this stage.
I am already encouraged about the way this is going. I can see the serene sort of end product that I am aiming for. It is quite common in my experience for the painting itself to tell me how it wants to be. Sounds crazy I know, but that's how it feels! So let's try mixing the most obvious colour and see how that looks.
Beginning to look like a painting already. Actually, and seriously, I am not sure why I don't simply stop here. From now on I am at risk of losing the freshness which is evident here. Anyway, suppressing my doubts, I refine it a bit more, still using acrylics.
This is as far as I am going in acrylic. The head is shaping up nicely, but I sense that the body is going to be a problem. There is nothing very distinctive about the plumage and I am not sure how I am going to tackle it. You can see in the picture above that the pencilled grid is still showing through the blue background. I have decided that I do not like this particular shade of blue - again, a good reason to try things out in acrylic first.
Now I suffer my usual panic attack. I have to move to the final painting in oils now and I am fearful that it is all going to go wrong. So, what do I do? I have a fiddle with another painting that I have lying around. It was an experimental approach to painting a Long Tailed Tit. It didn't really work, but maybe that was because I didn't take it far enough. Actually, that was the opinion of Liz Shewan, an artist who was exhibiting at Lyme Regis at the time, when I showed it to her on my Facebook page. ( www.lizshewanart.com ) Thanks Liz, it is great talking to other artists. So this is what I ended up with.
Anyway, back to the Great Crested Grebe. I squeeze out some oils and start experimenting further with the background.
I have used two blues above, French Ultramarine and Phthalo, and added a little Yellow Ochre to the foreground mix to try to pull it forward a bit. I have blended it heavily with a fan brush and you can see that I have slightly over-painted the bird in the process.
So the obvious next job was to try to re-establish the colour patterns on the bird. I have made a start above and I continue below. I have painted the eye and refined the facial pattern a little. Still dreading that body! Carry on and try not to look!
Below I try out some suggestive patterning on the body, it had to come sometime.
Then I brush the patterning out again! I also try to paint some of the water features, a little bow wave and a faint wake.
Finally I settle for a few bolder colour strokes and add a few colour highlights to the water. These actually existed in the original photo and were reflections of the nearby reed bed.
And that is about as good as it's going to get on this one. Hopefully I have achieved something of the serenity I was aiming for without getting too fussy and tight. It is still on my easel and I may have a look at it again this evening in case anything jumps out as being awry.
You can see all my paintings for sale at www.johncrabb.co.uk , just click on the "Oil Paintings" gallery.
ALL PHOTOS IN THIS BLOG WILL ENLARGE IF YOU CLICK ON THEM
This Blog post tells the story of how I painted a Fox in oils. The starting point was one of my own photos
My main interest has been wildlife and particularly bird photography. You can see the sort of thing I have been doing at www.johncrabb.co.uk
In the process of chasing dramatic photos I have gradually become more and more interested in the beauty of the final image. This is quite distinct from my interest in the birds and animals themselves. This idea of beauty has grown with me and some time ago I started to try to express some of my images in painted form. This was the subject of a previous blog.
I thought it might be interesting to record the process I am currently using by showing you the development of a single painting from start to finish. This is how it went.
The first step is to get the basic image on to the canvas, in this case it is a canvas-covered board 8 x 10" in size. To do that I draw a grid of squares over the original photo.
I then draw a similar grid of squares, but a bit larger, on the blank canvas. This is a well-known method of transcribing images across from one medium to another. All you have to do is draw the contents of each square on the photo on to the corresponding square on the canvas. I am only trying to get the outline at this stage. The next photo shows how the canvas looked after I have done a bit more work on the developing image, but you can see the square grid clearly enough.
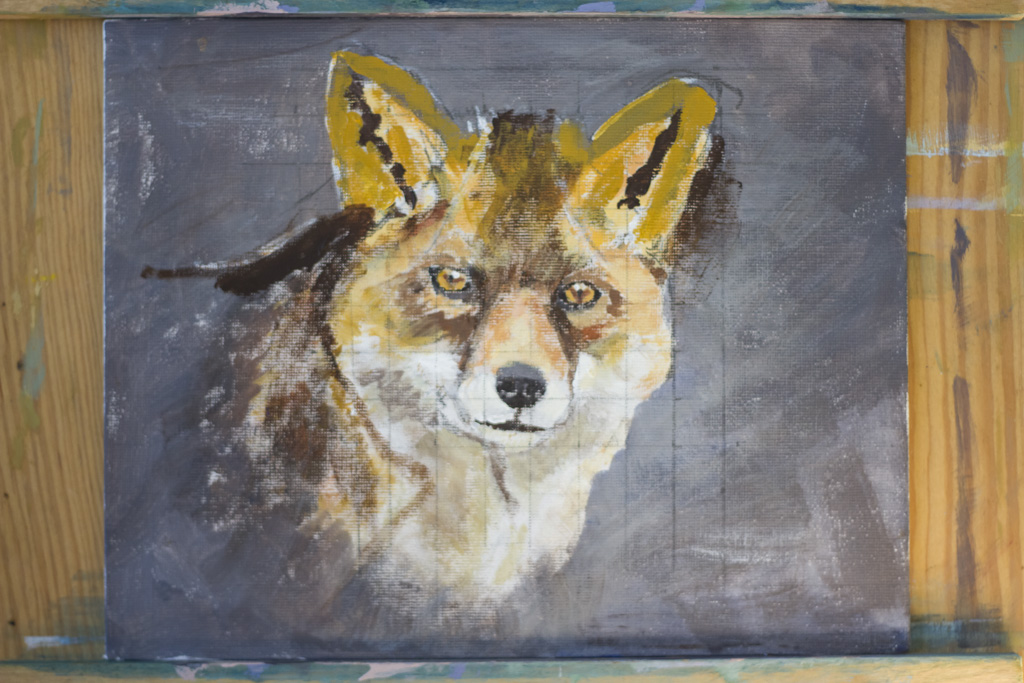
You can see that I have just started to block in some of the darkest shapes from the photo. This is done by eye of course, but the grid is a great help in getting things in about the right place! You will also notice that even at this early stage I have developed the eyes, nose and mouth to a much greater degree. I instinctively felt that these would be the key to producing an arresting image.
I continue trying to block in the main colour masses to build up the image. It is important to note that I am working in Acrylic paint at this point. This dries quickly and allows me to adjust things by over-painting if necessary. It will also provide a really good, stable base for the oil painting to follow.
I am very uncertain about background colour. I lay in a darkish neutral colour just to see what it looks like. Not very attractive I conclude, but still do not know which way to go on this for the moment.
OK, so have you noticed the glaring error that I made? Look at the Fox's forehead. It is far too shallow when compared with the original photo. I have missed out a whole row of squares above its eyes when transcribing the original image across to the canvas - twit! I kick myself for not having noticed the ridiculously wrong facial proportions.
I then have to try to find the original square grid. It has been quite heavily over-painted already but I manage to spot some of it and am able to reinstate it over the painting - you can see it below. This allows me to re-visit the original photo and reconstruct the upper part of the head in the correct proportions this time.This correction has also much improved the composition by moving the ear tips closer to the top of the canvas. It was this too-large gap at the top of the painting that I originally noticed and finally alerted me to the error I had made. This is the beauty of creating an acrylic underpainting where all these things can be resolved before committing to the final oils.

Below is the image at a slightly later stage, with the photo alongside for comparison. At least the head is the right shape now. I have also changed the background colour to an aquamarine sort of blue to complement the yellows and oranges in the face. I am working in oil paint now gradually refining the facial structure and reproducing the patterns of colouration in the original. I am not too slavish about this, I want the effect rather than an exact copy of the original.
From there of course it is not a huge leap to the final image, below. I have tried to give the effect of fur by sparsely over-brushing lighter colours on top of dark to give the layered effect found in real fur. It is quite difficult, especially when brushing into still-wet oil paint. It is all about communicating texture. Keeping the initial oil layers thin helps, otherwise over-brushing with the next colour picks up too much of the underlying layer.
The trouble with me is that, even when a painting is finished, I cannot resist coming back to it and fiddling. One day of course I will have a disaster, but so far I have managed to confine myself to delicate refinements. See if you can spot the difference between the image above and the "final" (I promise) version below.
The colours look a bit brighter in this photo of the painting, but they are actually unchanged, it is just the camera. What has changed very slightly is the shape of the tip of the nose. I have also lowered the bottom rim of the eyes slightly. This exposes marginally more of the actual eye and gives the animal a more engaging stare. I have only changed things by a few hairs' breadth, but there is a difference in the overall feel of the painting. It is very subtle at this stage. Finally I brushed in a little more shadow on the left side of its muzzle as you look at it. Better stop there!
When I started oil painting I was unsure about how I wanted to re-interpret my original photos. At first I thought I needed to decide on a style to try to achieve. I never did quite make this conscious decision, but in practice the paintings differ from the photo just due to the nature and limitations of the new medium. I am sure a style will develop as I do more and more.
If you are interested to see my other paintings, you will find them at my website here http://johncrabb.co.uk/gallery_694720.html