Wednesday, 22 June 2016

More bird oil painting

ALL PHOTOS IN THIS BLOG WILL ENLARGE IF YOU CLICK ON THEM 

Here is the finished painting. I thought I had better come clean up front so that you can decide if you want to read on. If so, here is the story of how it was painted.


I started the same way as usual, transferring a sketch outline across from one of my photos.
I use the squares method as you can see.


The next step was to block in some of the darker colours in acrylics. I have developed the habit of using acrylics to create a fairly developed under painting before proceeding to oils. I find I can relax and work out any technical problems as I go along. Any errors can be easily over-painted as the paint dries so quickly - too quickly for a finished work in my assessment, but fine at this stage.


I am already encouraged about the way this is going. I can see the serene sort of end product that I am aiming for. It is quite common in my experience for the painting itself to tell me how it wants to be. Sounds crazy I know, but that's how it feels! So let's try mixing the most obvious colour and see how that looks.


Beginning to look like a painting already. Actually, and seriously, I am not sure why I don't simply stop here. From now on I am at risk of losing the freshness which is evident here. Anyway, suppressing my doubts, I refine it a bit more, still using acrylics.


This is as far as I am going in acrylic. The head is shaping up nicely, but I sense that the body is going to be a problem. There is nothing very distinctive about the plumage and I am not sure how I am going to tackle it. You can see in the picture above that the pencilled grid is still showing through the blue background. I have decided that I do not like this particular shade of blue - again, a good reason to try things out in acrylic first. 

Now I suffer my usual panic attack. I have to move to the final painting in oils now and I am fearful that it is all going to go wrong. So, what do I do? I have a fiddle with another painting that I have lying around. It was an experimental approach to painting a Long Tailed Tit. It didn't really work, but maybe that was because I didn't take it far enough. Actually, that was the opinion of Liz Shewan, an artist who was exhibiting at Lyme Regis at the time, when I showed it to her on my Facebook page. ( www.lizshewanart.com ) Thanks Liz, it is great talking to other artists. So this is what I ended up with.


Anyway, back to the Great Crested Grebe. I squeeze out some oils and start experimenting further with the background.


I have used two blues above, French Ultramarine and Phthalo, and added a little Yellow Ochre to the foreground mix to try to pull it forward a bit. I have blended it heavily with a fan brush and you can see that I have slightly over-painted the bird in the process.


So the obvious next job was to try to re-establish the colour patterns on the bird. I have made a start above and I continue below. I have painted the eye and refined the facial pattern a little. Still dreading that body! Carry on and try not to look!


Below I try out some suggestive patterning on the body, it had to come sometime.


Then I brush the patterning out again! I also try to paint some of the water features, a little bow wave and a faint wake.


Finally I settle for a few bolder colour strokes and add a few colour highlights to the water. These actually existed in the original photo and were reflections of the nearby reed bed.


And that is about as good as it's going to get on this one. Hopefully I have achieved something of the serenity I was aiming for without getting too fussy and tight. It is still on my easel and I may have a look at it again this evening in case anything jumps out as being awry.

You can see all my paintings for sale at www.johncrabb.co.uk , just click on the "Oil Paintings" gallery.


Sunday, 5 June 2016

Frog Painting

PHOTOS IN THIS BLOG WILL ENLARGE IF YOU CLICK ON THEM
 
OK, so I am going to give an honest account of my experience of trying to paint a frog. This is not one of those normal art demos where the artist seems to start with so much skill that, no matter how carefully they explain it, you cannot really see yourself doing it. This is how it actually feels to be a relative beginner in oil painting. Maybe someone will identify with it. The starting point is this photo of a frog that I took some while back.


I like it because of the frog's characterful face. I also thought it might be easier than birds, it hasn't got feathers after all! 

So I start off the same way as usual. I lay a grid of squares over the photo and transfer it across to the slightly larger squared grid that I have drawn on my canvas.


Here it is. Not looking too bad so far!

 
Then what I do is not really part of the painting process and would not figure in most art demo blogs. What I do is walk about the house looking for things that need doing. The idea here is that I really do not want to start on the painting so I look for excuses not to. Maybe I am the only person who does this, I don't know. The reason is that I am scared. The weather is looking fine, maybe I could go out somewhere for a few hours.

The sketch is looking so good that I am pretty sure that I am going to spoil it once I start laying on colours. I really feel that I do not know what I am doing. More accurately perhaps, I look into the immediate future of the painting and see nothing but uncertainty and potential failure, my failure.

Anyway, after several days and having run out of reasonable excuses, plus it's raining, I make a start.

I lay in a dark green background. Seems safe enough, but already I do not like it. Never mind, ignore it, I can change it later perhaps. Then I try to mix some of the brownish colours on the frog and block in some of the darker shapes. Actually quite enjoying it for the moment!


At this stage I am using acrylic paint. My aim is to build up an under-painting that I can then finish in oils. I feel quite safe with this as I know I am not producing the finished work yet. The paint dries quickly and I can easily overpaint it if I make a mistake. One slight problem that you can probably spot from the photo above is that I am steadily obliterating the pencil grid that I drew to guide me. So if major restructuring is required it will have to be done by eye. This acutally turns out to be a real problem a bit later as I attempt to reproduce some of the markings on the frog's face. For the moment though let me just work on the reflection. It is curiously blue looking. I also manage to make some drawing mistakes here that I never quite manage to eliminate from the painting. Ho Hum!


Because I feel safer working on the acrylic under-painting, I decide to continue and add more detail. Actually, it is necessary as I am finding the facial markings and, in particular, the structure of the eyes, rather difficult to understand. Who knew that frogs were so complicated?


Still trying to get the face and eyes sorted out (below) and feeling a bit embarrassed that I am putting so much effort into this stage of the work. Never mind, nobody is watching and no one will ever know. Besides, I feel the need to get this sorted out, even if it is just by trial and error.


After a few hours inconclusive work I begin to wonder if adding some water weeds will take the viewers' eyes off the rather inscrutable face. So I tentatively put some in.


OK, that is about as far as I feel I can go in acrylics. Time now for the final oil painting. Of course this provokes another severe bout of prevarication. It seems like it will be for real now, so I look for other urgent tasks, even non-urgent tasks, to distract me. It is amazing how much there is to do!

About a week later I finally squeeze some oil paints out and start trying to mix some of those subtle colours. My first job is to replace the background with a more lively looking green. Again, backgrounds are a safe starting point. Then it is just a matter of working progressively through the under-painting and refining shapes and colours with the oils. In the process I do away with the water weeds, but perhaps that was a mistake. Not sure. I get so absorbed in the oil painting that I forget to take any more photos as the work progresses. It takes most of the day.


Finally, I stand back and try to appraise the result. It is no good to keep interfering with it in the hope of making it right by a magic accident of brushwork. You have to blow the whistle and accept it for what it is. Here is the final image below. It is just 8 x 10" on canvas-covered board. A portrait of a frog.


I do not often feel really happy with my finished works at the moment. Naively perhaps, I look forward to a time when I will. This was my hope at least until my son, who is a proper artist,  http://www.paintingnature.co.uk/ told me that the difficulties never go away!

Perhaps the best philosophy is just to keep trying and not get too hung up if things do not go well. Years ago the teacher at an art class I attended used to say "That is probably about enough work on one painting" and would then suggest starting the next. Good idea, it will probably be a fox next.

All my paintings to date may be found at http://johncrabb.co.uk/gallery_694720.html


Friday, 20 May 2016

Painting a Fox in Oils

ALL PHOTOS IN THIS BLOG WILL ENLARGE IF YOU CLICK ON THEM

This Blog post tells the story of how I painted a Fox in oils. The starting point was one of my own photos


My main interest has been wildlife and particularly bird photography. You can see the sort of thing I have been doing at www.johncrabb.co.uk 

In the process of chasing dramatic photos I have gradually become more and more interested in the beauty of the final image. This is quite distinct from my interest in the birds and animals themselves. This idea of beauty has grown with me and some time ago I started to try to express some of my images in painted form. This was the subject of a previous blog.

I thought it might be interesting to record the process I am currently using by showing you the development of a single painting from start to finish. This is how it went.

The first step is to get the basic image on to the canvas, in this case it is a canvas-covered board 8 x 10" in size. To do that I draw a grid of squares over the original photo.


I then draw a similar grid of squares, but a bit larger, on the blank canvas. This is a well-known method of transcribing images across from one medium to another. All you have to do is draw the contents of each square on the photo on to the corresponding square on the canvas. I am only trying to get the outline at this stage. The next photo shows how the canvas looked after I have done a bit more work on the developing image, but you can see the square grid clearly enough.


You can see that I have just started to block in some of the darkest shapes from the photo. This is done by eye of course, but the grid is a great help in getting things in about the right place! You will also notice that even at this early stage I have developed the eyes, nose and mouth to a much greater degree. I instinctively felt that these would be the key to producing an arresting image.


I continue trying to block in the main colour masses to build up the image. It is important to note that I am working in Acrylic paint at this point. This dries quickly and allows me to adjust things by over-painting if necessary. It will also provide a really good, stable base for the oil painting to follow. 

I am very uncertain about background colour. I lay in a darkish neutral  colour just to see what it looks like. Not very attractive I conclude, but still do not know which way to go on this for the moment.


OK, so have you noticed the glaring error that I made? Look at the Fox's forehead. It is far too shallow when compared with the original photo. I have missed out a whole row of squares above its eyes when transcribing the original image across to the canvas - twit! I kick myself for not having noticed the ridiculously wrong facial proportions.

I then have to try to find the original square grid. It has been quite heavily over-painted already but I manage to spot some of it and am able to reinstate it over the painting - you can see it below. This allows me to re-visit the original photo and reconstruct the upper part of the head in the correct proportions this time.This correction has also much improved the composition by moving the ear tips closer to the top of the canvas. It was this too-large gap  at the top of the painting that I originally noticed and finally alerted me to the error I had made. This is the beauty of creating an acrylic underpainting where all these things can be resolved before committing to the final oils.


Below is the image at a slightly later stage, with the photo alongside for comparison. At least the head is the right shape now. I have also changed the background colour to an aquamarine sort of blue to complement the yellows and oranges in the face. I am working in oil paint now gradually refining the facial structure and reproducing the patterns of colouration in the original. I am not too slavish about this, I want the effect rather than an exact copy of the original.


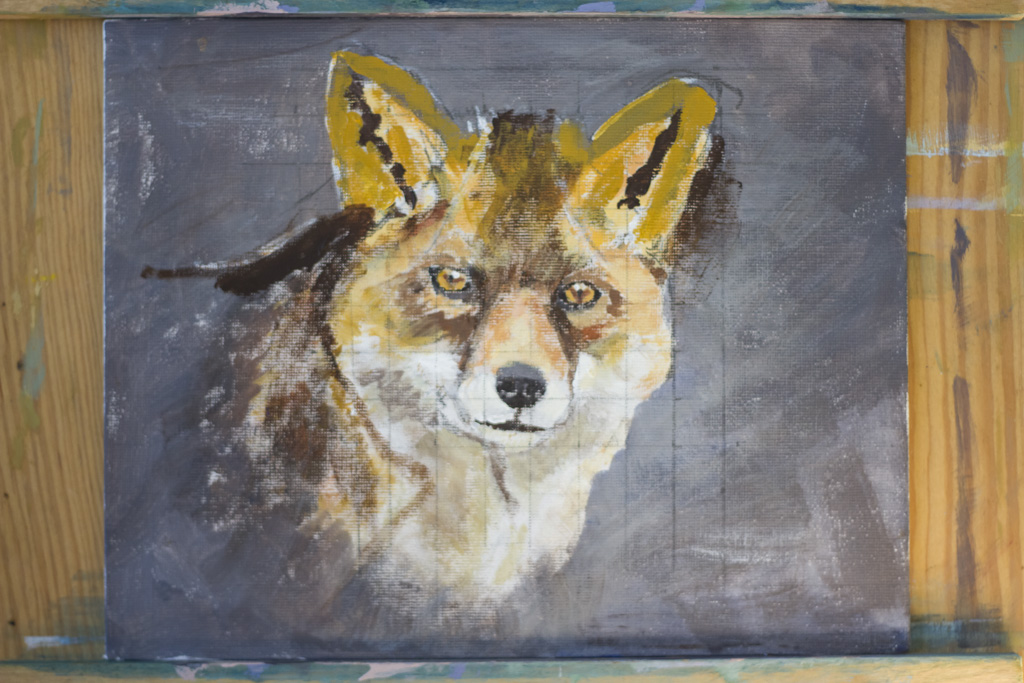
From there of course it is not a huge leap to the final image, below. I have tried to give the effect of fur by sparsely over-brushing lighter colours on top of dark to give the layered effect found in real fur. It is quite difficult, especially when brushing into still-wet oil paint. It is all about communicating texture. Keeping the initial oil layers thin helps, otherwise over-brushing with the next colour picks up too much of the underlying layer.


The trouble with me is that, even when a painting is finished, I cannot resist coming back to it and fiddling. One day of course I will have a disaster, but so far I have managed to confine myself to delicate refinements. See if you can spot the difference between the image above and the "final" (I promise) version below. 


The colours look a bit brighter in this photo of the painting, but they are actually unchanged, it is just the camera. What has changed very slightly is the shape of the tip of the nose. I have also lowered the bottom rim of the eyes slightly. This exposes marginally more of the actual eye and gives the animal a more engaging stare. I have only changed things by a few hairs' breadth, but there is a difference in the overall feel of the painting. It is very subtle at this stage. Finally I brushed in a little more shadow on the left side of its muzzle as you look at it. Better stop there!
When I started oil painting I was unsure about how I wanted to re-interpret my original photos. At first I thought I needed to decide on a style to try to achieve. I never did quite make this conscious decision, but in practice the paintings differ from the photo just due to the nature and limitations of the new medium. I am sure a style will develop as I do more and more.


 If you are interested to see my other paintings, you will find them at my website here http://johncrabb.co.uk/gallery_694720.html

Saturday, 16 April 2016

From Bird Photography to Oil Painting Birds

 ALL THE PHOTOS IN THIS BLOG WILL ENLARGE IF YOU CLICK ON THEM

These days I like to think of myself as a bird photographer. If you visit my website at www.johncrabb.co.uk  I think you will appreciate why. It is crammed with bird photos! Logical.

I have been taking bird photos for five or six years now. It has been a passion and a very satisfying passtime. I think I have generally improved and certainly never lost interest in the pursuit of better and better photos. Until now perhaps.

Almost since the beginning I have been aware that I have an interest in it that goes beyond just getting clever photos of birds and other wildlife, satisfying though this is. Something else has always been in the back of my mind and has been growing in significance as time has gone on - I am interested in making beautiful pictures. Gradually I have searched for beauty in the photos I take. Take this picture of a Chiffchaff on a wire for instance.


This was quite an early shot of mine, but it has always haunted me. I was alerted to it by a comment made when I was giving one of my illustrated talks, on this occasion to a camera club. A man in the audience said it moved and saddened him to see the contrast between the soft vulnerability of the bird and the harsh cruelty of the barbed wire. That comment opened my eyes to the fact that my photos could be more than just snaps of different types of birds, they also had emotional and often artistic content too.

Anyway, to cut a long story very short, this idea of artistic beauty gradually grew within me until one day I took the daring step to lay down my camera for a while and see if I could reinterpret some of my photos as paintings. Daring! Especially as I had not tried any thing artistic for more than thirty years.

I attended a short oil-painting course and was expertly taught the basics of oil technique and colour mixing. There then followed a period when I assiduously painted oranges, apples and lemons to see if I could actually render a plausible image on to canvas. Then the big leap to working with some of my bird photos as a source. Here is my first oil painting. It is a reinterpretation of the photo above.


It was a very uncertain, but quite satisfying, beginning. I realised how little I knew about painting and therefore how much there was to learn in what remains of my life. I wish I had started sooner!

I was determined in this painting to try to remain true to the idea raised in that camera club talk. Accordingly I tried very hard to reproduce the appearance of the barbed wire. The bird I rendered more softly.

I cannot really describe to you how difficult I am finding this new activity. Each time I sit down before one of my photos and an empty canvas I feel great anxiety and uncertainty. Usually I just stand up again and walk around the house looking for other things that need doing. Any horrible chore suddenly seems more approachable than to attempt a painting. Failure seems to be almost certain and I do not want to fail. But eventually I start.

Sometimes I am surprised how the image grows in front of me. It does not seem to be anything to do with me. I just have to have the courage to keep going, to keep mixing the colours and dabbing on the paint in approximately the right places. Also I need the wisdom to know when to stop! The desire to overdo stuff in an attempt to rescue it is very strong.

My second ever bird painting is shown below.


It is the same bird on a different stretch of wire. Again I have tried to render the wire accurately but this time the bird was more difficult as much more of its feather structure had to be protrayed. These paintings are just 8 x 12" and painted with quite large brushes. I use large brushes because I am fighting against the temptation to reproduce every small detail and thereby end up with an exact copy of the original photo. I want more than that - I will say something more later. But for the time being the problem is, and still is actually, how to satisfactorily portray enough of the feather structure without chasing the details. I think that I have accidentally got it about right in this painting. See particularly the large primary feathers on the folded wing and also the tail. They look fairly convincing just as they are.

The next painting was this one I think, a Long Tailed Tit.


Here, instead of using barbed wire for the emotional contrast with the bird I have substituted a nasty looking bramble. Starting this one was again daunting. Looking back I really do not know where I found the courage. You may think I am overstating the difficulty, but it seems rather real to me! 

Or maybe my next painting was this one. I rather think it was, come to think of it. Another Chiffchaff on another wire in completely different lighting conditions.


Before I ever attempted to paint birds I tried to think of an approach, or vision, that I could embrace and aim for. As I said, I did not want just a copy of the original photo but wanted to add something, or perhaps just extract the essence. I actually never came to a conclusion about the approach to adopt, I just started trying to paint. What I am finding now is that the paintings come out to be different from the photos, but in an accidental sort of way. For now this difference between the photo and the painting is enough for me, but eventually I hope to develop a vision of how I want the paintings to look and what I want them to convey, and set about trying to achieve it deliberately.

This next painting is of a Linnet, again on a wire.


I am struggling a bit with creating backgrounds for my paintings. Normally I ignore the background in the photo (unless it is particularly appealing) and try to think of something that will complement the bird image.

I have done about six paintings at this early stage in my career and am still no more confident when I start each one than I was at the beginning. My technique so far is to transfer an approximate outline of the bird on to the canvas using the "squaring off" method. That is to say, draw a regular grid of lines over the photo, draw a similar grid on the canvas but perhaps larger, then sketch across the contents of each square on the photo until you have a workable outline on the canvas. It is a well know method apparently and it works well enough. I then block in some darkish colours corresponding to the main colour areas of the bird. These under-layers serve as the deepest layer of feathers and I usually build up the lighter upper layers by sparsely brushing them on in the appropriate colour. Sometimes I do the under-layers in acrylic paint as it dries quickly - not sure how I will proceed from here. Before building up the plumage, it is important to get the background in so that I can brush some of the feather ends out into it to soften the bird's outline.

I devote some particular care to painting the eye and the beak with a small brush, but trying not to make it look too fussy. This area of the bird's face has to look convincing I feel.

For my sixth painting I tried this Long Tailed Tit. The canvas board is only 5 x 7" and it was very fiddly to paint the bird.


What I would really like to do at this size is to represent the bird with just a few, bold but well-chosen strokes. I do not seem to dare at the moment and always find myself attempting to reproduce at least some of the details. I really do feel that I have a big hill to climb.

Here is a shot of my work station with the next painting underway. You can see that I have transferred the image and have got as far as blocking in the main colour areas. I am, as always, currently dreading getting back to this for fear of making a mess of it! Have been quite lucky so far though, so fingers crossed. Note that the electronic kit in the background is for something else!


So, that is the story so far. I would like to write another Blog on this subject in a few months time so that we can all see how I have developed.

In the meantime, you can see all my paintings at http://johncrabb.co.uk/gallery_694720.html

Please let me have your reactions to this story. Any  encouragement also welcome at this delicate stage!


Saturday, 5 March 2016

More Wildlife of the Wetlands

All the photos in this blog will expand if you click on them.
 
Some nice activity recently. So pleased to be out with my camera on a nice day!


First up is this Roe Deer caught relaxing at #RSPB Ham Wall a short while back. It had found a nice sunny corner out of the wind and seemed quite happy for me to snap away from a distance.
 

Then there was this pair of Canada Geese. After mating they performed a short dance, raising their wings and necks. Very pretty.


There were quite a lot of Canada Geese flying aroung too. Here is an attractive gaggle in flight.


I think the highlight of my recent visit to Ham Wall was this Great Crested Grebe. To my astonishment I counted it catching seven or eight sizeable fish in a period of little over an hour! Amazing appetite.


Some ducks in flight too, like this Gadwall. When I see ducks take to the air at Ham Wall I am always on the look out for a possible Otter. Sadly, I did not spot one on this occasion.


The other site I have been frequenting recently is #Seaton Wetlands. It can often be quiet on the wildlife front there, but not yesterday! 

First delight was the resident Glossy Ibis. You cannot always guarantee seeing it, and sure enough at first it was not evident. Suddenly though it flew into view at the Seaton Marshed hide. The light was not good for photographing a dark bird, but got some shots.


It hung around for about half an hour, sometimes flying and sometimes feeding along the water's edge.


It has been at Seaton since last November. No idea whether it will stay longer but it seems very content.

Whilst nothing else was going on, this Dunnock perched nearby and serenaded me. Lovely sound of Spring.


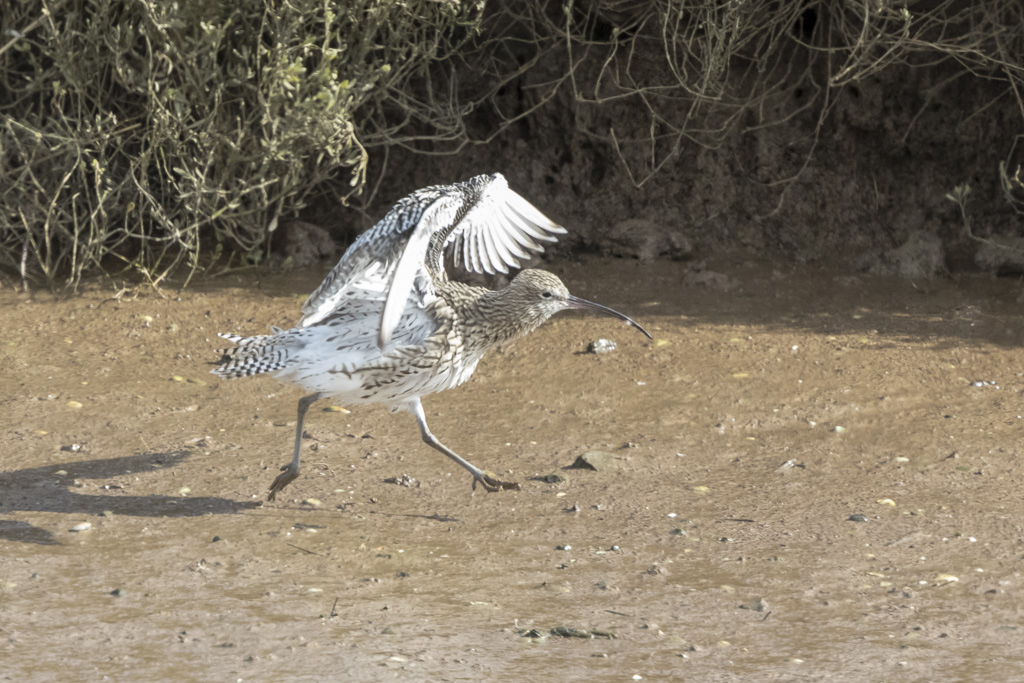
Curlews are supposed to be becoming more rare, but there were quite a few at Seaton, including this joyous individual taking a run along the mud.


But the best excitement was a Fox. I always get excited at the prospect of a Fox photo. When I first spotted it it was some way away. I feared it would not come any closer so I took a distant snap.


Sure enough, after it had looked in my direction for a while, it moved off away from me. But all was not lost! I have seen this Fox doing its rounds before so I focussed my attention on the Tram Lines, he often comes back that way. 

First sign that it was approaching was some calling Crows, then two rabbits quickly scampered down the bank to safety. Within seconds it came into view. A fine portrait!


I am gradually learning that success in wildlife photography depends a lot on being able to anticipate the subjects next move. Not always possible of course, but it sometimes makes the difference.

Please visit my main website at www.johncrabb.co.uk and follow my activities on www.facebook.com/johncrabbwildlifeimages

Thanks!